I'll never forget the time we threw you a surprise party and Noel tried to take off his fleece and instead of just the fleece he took his t-shirt off too! Hehehe...I bet that's the only year you've ever had a stripper for your birthday. :)
I love you mom- you're always there for me and you are truly my best friend. Happy Birthday!
And as a side note- I had to go all the way back to my bridal shower to get a picture of us together...sad day. Next time I visit you have to get out from behind the camera!!
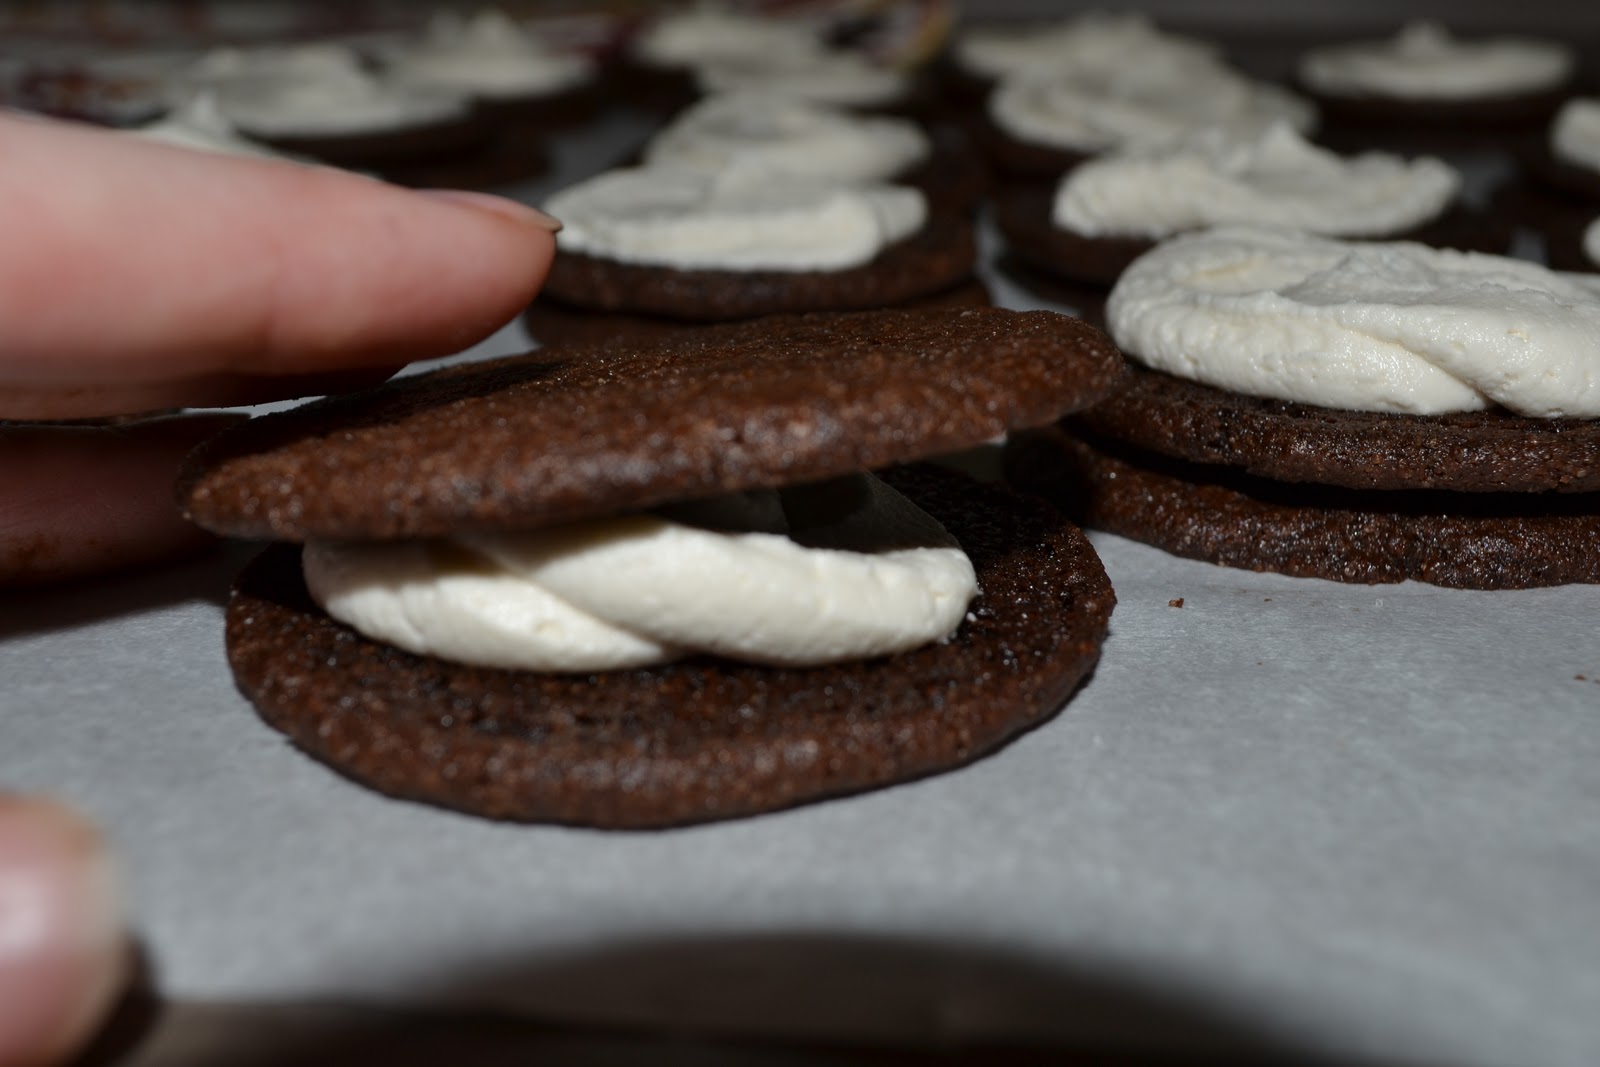
Please make these. Now. When I open up my bakery/organizing business with my sister we will sell these and eat them while sitting on the porches of our neighboring mansions in the Hamptons. Hey, a girl can dream right?
These are super sweet so be sure to have a glass of milk standing by. The Smitten Kitchen never lets me down...
For the chocolate wafers:
1 1/4 cups all-purpose flour
1/2 cup unsweetened Dutch process cocoa
1 teaspoon baking soda
1/4 teaspoon baking powder
1/4 teaspoon salt
1 to 1 1/2 cups sugar [see recipe note]
1/2 cup plus 2 tablespoons (1 1/4 sticks) room-temperature, unsalted butter
1 large egg
For the filling:
1/4 cup (1/2 stick) room-temperature, unsalted butter
1/4 cup vegetable shortening
2 cups sifted confectioners’ sugar
2 teaspoons vanilla extract
Set two racks in the middle of the oven. Preheat to 375°F.
In a food processor, or bowl of an electric mixer, thoroughly mix the flour, cocoa, baking soda and powder, salt, and sugar. While pulsing, or on low speed, add the butter, and then the egg. Continue processing or mixing until dough comes together in a mass.
Take rounded teaspoons of batter and place on a parchment paper-lined baking sheet approximately two inches apart. With moistened hands, slightly flatten the dough. Bake for 9 minutes, rotating once for even baking. Set baking sheets on a rack to cool.
To make the cream, place butter and shortening in a mixing bowl, and at low speed, gradually beat in the sugar and vanilla. Turn the mixer on high and beat for 2 to 3 minutes until filling is light and fluffy.
To assemble the cookies, in a pastry bag with a 1/2 inch, round tip, pipe teaspoon-size blobs of cream into the center of one cookie. Place another cookie, equal in size to the first, on top of the cream. Lightly press, to work the filling evenly to the outsides of the cookie. Continue this process until all the cookies have been sandwiched with cream. Dunk generously in a large glass of milk.
A few notes...I didn't use the full 1 1/2 cups of sugar to the cookie batter- these are really so sweet you only need 1 cup. And add a sprinkle of salt to the filling- it will help cut the sweetness factor a bit. Also, I rolled the dough into small balls (you could use a melon baller if you have one) and then flattened them to the thickness and size desired. Think real oreo size- not too much bigger. The most important thing is to be sure they are small enough to dunk in a glass of milk. :)
Oh- and these are crispy cookies. If you like them a little chewier then you should underbake them- about 7 1/2 minutes if you flatten them out quite a bit like I did.
My late class was canceled yesterday due to unexpected ice- yay!! So instead of discussing HR Management, I got to cuddle on the couch with my favorite person and watch Zombieland. Hilarious. :)
My enjoyment this morning came from the perfect cup of tea. I love when it gets cool enough to drink without scalding your tongue but still hot enough to warm me from the inside out on a cold day. I've been on a tea kick lately...can't really stand the taste of coffee right now but I'm sure I will convert back to it by the time final exams roll around. Here are my absolute favorites:
I've gotten several comments from friends and family about the candied pecans I made as gifts for Christmas, so I thought I would share. (That is I will share the recipe...you have to seriously suck up to me to get these hand delivered.) I bet I made at least 10 batches of these and never got tired of them over the holidays (a great thing for my taste buds...not so good for my hips!)
1/3 cup dark-brown sugar
2/3 cup white granulated sugar
1 teaspoon kosher salt (I might up this by a 1/2 tsp. next time for more of a sweet/salty balance)
Generous pinch of cayenne pepper (I swapped this with 1/4 teaspoon of hot smoked paprika)
1 teaspoon ground cinnamon
1 pound walnut or pecan halves or whole peeled hazelnuts
1 egg white, room temperature
1 tablespoon water
Preheat oven to 300 degrees. Mix sugars, salt, cayenne, and cinnamon, making sure there are no lumps; set aside. Beat egg white and water until frothy but not stiff. Add walnuts, and stir to coat evenly. Sprinkle nuts with sugar mixture, and toss until evenly coated. Spread sugared nuts in a single layer on a cookie sheet fitted with parchment paper. Bake for 30 minutes, stirring occasionally. Remove from oven, and separate nuts as they cool. When completely cool, pour the nuts into a bowl, breaking up any that stick together.
Please forgive the out-of-focus picture. This is before I got a new camera for Christmas and I was still using my husbands camera that he got years and years and years ago.
May I also suggest that these would make GREAT Valentine's Day treats. :) Here are a few ideas for packaging these up in a lovey-dovey and absolutely adorable way:
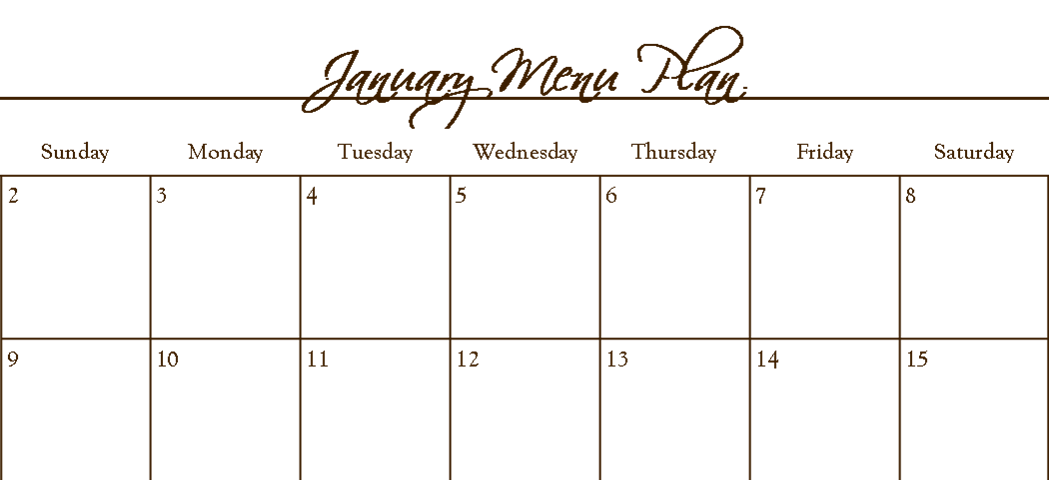
It's a futile search...every year I'm on the hunt for the perfect planner, but I never seem to find one that works perfectly for me. So this year I decided that I would take elements from planners of years gone by and create my own customized planner that would work for me this year. 115 pages and a few hours later I was done! Here are a few of my favorite elements that I included...
1) A large monthly planner. I'm not good enough to keep up with a detailed weekly planner- I do much better if I can see the month all together. No kiddos to keep up with...just a husband and crazy school schedules so I don't need too much room. One month spread over two letter size pages works best for me- I'll print these out and have them spiral bound so each month is easily accessible.
2) Monthly Financial Checklists! I've always kept a checklist of bills that need to be paid each month so I decided to incorporate that into my planner this year. I can simply check off each bill as it is paid and I also listed my bills that are auto-drafted so I don't forget that money is flying out of our bank account as fast as Devo's fame faded in the 80's. I also listed our savings goals for the year so I can record our balance and keep track of our progress.
3) Meal Plans! I've added a smaller calendar on the next page that is dedicated to menu planning for that month. I don't bother to plan out breakfast or lunch. (It's always cereal or poptarts and the standard soup or sandwich making ingredients since we pack our lunches.) This smaller calendar is just enough to jot down what's for dinner each night so I can remember what to buy at the store and what to take out of the freezer each morning.
4) Shopping List! I usually do one large shopping trip each month. I can buy all our meat in bulk and separate it into freezer bags and most other ingredients/ snacks/ fruits/ veggies we will need for the month. I also make a short trip every week or two to get milk and bread and to take advantage of any good coupon deals that are going on. It makes it really convenient to have my menu plan on the opposite page as I create my shopping list. And the coupon check list keeps me straight while I'm at the store because I can note how much each coupon is for and if there are any conditions such as buying 2 of the item or a particular size without having to stand in the middle of an aisle and search through my coupon bag.
5) Christmas Gift Giving List! Thanks are due to I Heart Organizing for this idea. I used Jen's downloadable Gift Giving Plan this year and absolutely loved it! So I've added a modified version to my planner to use around Christmas time so I don't forget what I've purchased for who!
6) Address list! I hate searching for addresses when I want to send a card. Inevitably, I can't find an address right away and I forget about what I wanted to send so my friends end up thinking they are unloved. Sad. I really do love you guys and think about you often! I'm just forgetful. *sniff* So maybe this address list will help. I've also added a portion that will allow me to keep up with those who send me Christmas cards and those I send Christmas cards to. It's on my 30 before 30 list. I only have one more Christmas to actually get cards out...the pressure is on!
7) Days to Celebrate List! A place to list birthdays and anniversaries to remember.
8) And last but not least...extra pages for notes are essential!
And because I love you and I hope someone else can use what I've created...here is a free printable version for you! You can print it back and front and have it spiral bound for probably less than $10-15...enjoy!